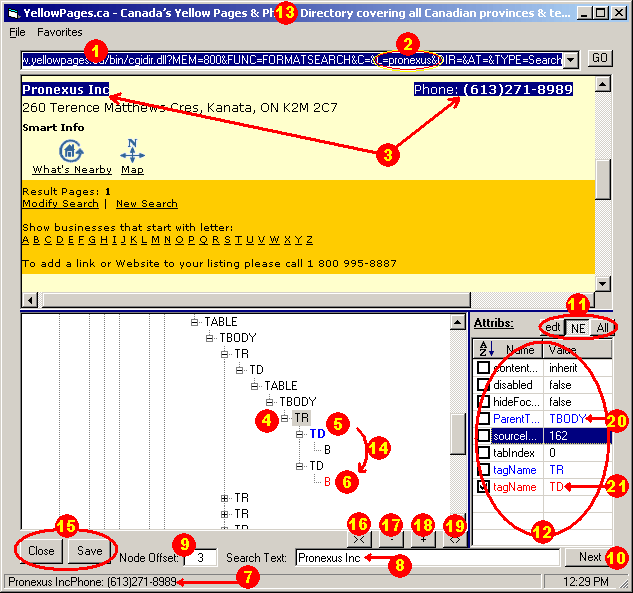
The URL you want to hit. This field is read from ISourceURL property and replaced with your example when it contains property substitution.
If you change this text and hit GO (or enter), the visual browser will browse to the new URL. However, when saving and exiting, any property substitution that was used will be lost. This does not happen if you do not make any changes to the URL field. However, if the page redirects to a different URL, the same applies.
A dropdown list box keeps all the previous hits during this session and the favourite menu stores a URL for future use.
This is the portion of the URL that was replaced by an example. Saving without making any change to the URL will remove your example and get back the original property used.
The area of the visual browser is enhanced to show you the relation between certain text and its innermost-enclosing node. Using the mouse to select the full line from Pronexus to the end of the phone number, the corresponding node with the tagName TR is being selected below in the document nodes hierarchy. Hover the mouse over any text in this area to show the text of the innermost node.
This is the node selected when you click or select certain text in the visual browser above. Hover the mouse over one of these nodes to show the InnerText property of that node in the status bar below; the same text shown above when hovering over the corresponding text in 3. This helps you find the node you are searching for on the fly. Click the node you want to show its properties in the attributes on the right side of the window.
This is the node we expect WebQuery to find in runtime. Right-click this element to reveal the following pop-up menu:

Context-sensitive menu of a node
Click Copy To Search Text Box command to copy the InnerText property of this node to the Search Text box for extra editing.
Show the same node context menu again and click Set as node to search for; this will use this node as base for setting the INodeOffset property later in 6 below.
Suppose this is the node we want its InnerText and InnerHTML properties to be returned. Right-click this node (after you have set the node to search for in 5 above) and click Set as node to return in results from its context menu:
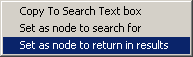
Context-sensitive menu of node after setting the node to search for
This should turn the previous node (5) to blue as the expected node to find, and this node to red as the returned one. Also, this should set the INodeOffset property to the correct number, which is the difference between those two nodes' sourceIndexes.
7. The status bar shows always the InnerText property of the node that the user is holding the mouse on, either in the visual browser panel or in the node hierarchy panel.
Search Text box is where you edit the texts you want to search for and, as discussed, wildcards are acceptable.
This text box shows you the value the INodeOffset property set in steps 5 and 6.
The Next button finds the next match in the document that meets all your criteria. When the end of the document is reached, it prompts you to choose to restart from the beginning.
Buttons to manage the property filters as follows:
edt:: This button edits the property filters. When you click it the following window will show:

Property filters editing window
Use this window to manually enter the key/value pairs that filters the node you want to search for depending on its properties.
These filters will be saved in the WebQuery main property page later.
NE: Click this button to show only the properties of the currently selected node that are not empty or null.
All: Click this button to show all the available properties of the currently selected node.
This panel shows the properties of the current node, the one selected in the node hierarchy panel on the left side of this window. Normal properties (or what are referred to as attributes in MSHTML documentation) are in black, but those that are specially added by WebQuery are in blue:
tagName: The tag name of the current node.
sourceIndex: The index of the current node in the whole document.
ParentTag: The tag name of the closest parent node of the current node.
Mark the check box of the property you want to use it as a filter, this is a practical add property method to the INodeQueries filters mentioned earlier.
The window title always shows the title of the page you are browsing.
Always remember that INodeQueries property is set as the difference between the value of sourceIndex property of node you set as node to search for and the value of sourceIndex property of the node you set as node to return in results.
These buttons save and exit this window.
This button, as well as the following three, help you explore the document in the node hierarchy panel. Click this button to collapse all the hierarchy.
Click this button to collapse only one level in depth of the hierarchy.
Click this button to expand only one level in depth of the hierarchy.
Click this button to expand all the nodes in the hierarchy.
Note: You can always interrupt the expanding or collapsing process by pressing the ESC key on your keyboard. This is especially important for those rich pages.
The properties that appear in blue in the node property panel are the specially added ones.
The properties that appear in red are not actually properties that describe the node, rather they are properties that are set to be used as a filter but the currently selected node does not meet this criteria. This helps to determine why a certain node is not being selected (or found when clicking next). You can un-check the box beside one of these properties to loosen the criteria by removing this property from the filter list.