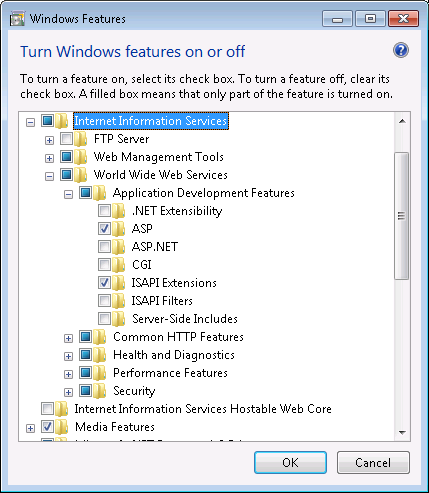
Enabling VisualConnect™ functionality requires the use of Microsoft Internet Information Services. IIS needs to be installed on the same
machine running the VBVoice application and configured to route web requests to VisualConnect scripts.
-
Click the Start button, click Control Panel.
-
Click System and Security, click Administrative Tools.
-
In the Administrative Tools window, double-click Internet Information Services (IIS) Manager.
-
In the Connections list, expand the server you are managing.
-
Right-click Application Pools and select Add Application Pool.
-
In the Add Application Pool dialog box, enter a name for the new application pool, e.g. VisualConnect.
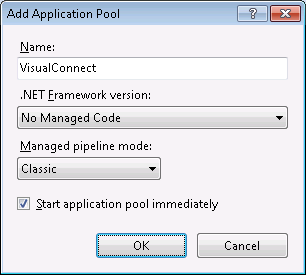
Choose No Managed Code for the .NET Framework version and Classic as the managed pipeline mode, then click OK.
-
Right-click the newly created application pool and select Advanced Settings.
-
In the Advanced Settings dialog box set the following parameters:
- If this machine is running a 64-bit operating system, set Enable 32-Bit Applications to True in the General section.
- In Process Model section, change the Identity to LocalSystem.
- Disable regular recycling by setting Regular Time Interval (minutes) to 0 in the Recycling section.
-
Click OK to accept these settings and close this dialog box.
-
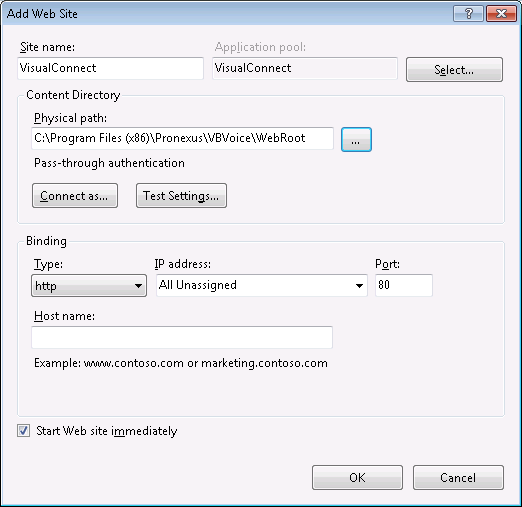
Now back to the Connections list, expand the server you are managing, right-click Sites
and select Add Web Site.
-
Enter a name for the new site in the Site name field, e.g. VisualConnect.
-
Change the default application pool to use the one created in step 6 above, by clicking the Select button
and selecting the right application pool from the drop-down list showing in the Select Application Pool dialog box:
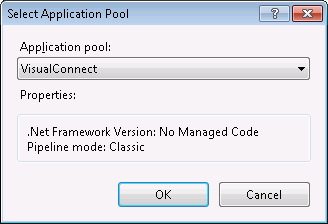
Click OK to accept your selection and close this dialog box.
-
Point this web site to VBVoice's virtual directory by entering its full local path in the Physical Path field.
This path is normally C:\Program Files (x86)\Pronexus\VBVoice\WebRoot for a 64-Bit operating system,
or C:\Program Files\Pronexus\VBVoice\WebRoot for a 32-Bit operating system.
Note that changing the default installation directory of VBVoice changes this path..
-
Click OK to create the new web site, if a warning message about port 80 being already assigned to another web site,
click No, modify port field to use one other than 80 and click OK again.
Note that when changing the default web site port, the new port must be used in the URL to browse to the VisualConnect application.
-
In the Connection list, select the newly created web site, right-click on ASP in the Features View pane,
and select Open Feature.
-
In the Behavior section, set the Enable Parent Paths setting to True.
-
Click Apply from the Actions list to the right of the Features View pane.