LineGroup 
(Added automatically by template)
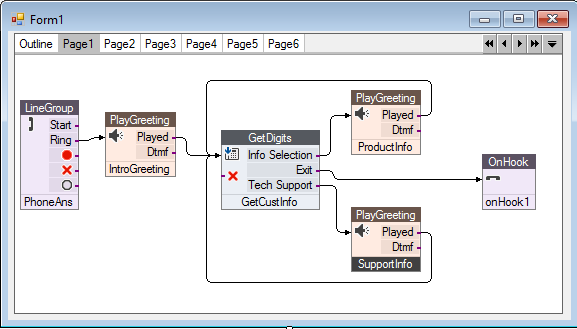
The LineGroup control picks up the phone when it rings. Incoming calls are automatically routed to the Ring output node of this control.
PlayGreeting 
The PlayGreeting control greets the caller with a short message and passes the call to the next control.
To add the PlayGreeting control to the E-Z Flow form:
-
Select the PlayGreeting control from the toolbox.
-
Insert the control immediately to the right of the LineGroup control.
-
Change the name of the PlayGreeting control to PlayGreet.
GetDigits 
The GetDigits control presents a menu of options to the caller, including company and product information, customer support numbers, and an exit option. The control then accepts and processes the caller's selection. The options are established in the Setup dialog associated with this control.
To add the GetDigits control to the E-Z Flow form:
-
Select the GetDigits control from the toolbox.
-
Insert the control form immediately to the right of the PlayGreet control.
-
Change the control name to GetCustInfo.
-
Click the control button, right-click and choose Properties from the context menu, and select the Routing page.

To create a setup entry for each digit:
-
Select the Routing page.
-
Delete the current default entries by selecting them and clicking Delete.
-
Click New to add a new entry.
-
Set the digit mask (used to validate any entry) by typing 1 in the Digit Data box.
-
Set the condition name to Company Info - 1.
-
Click OK.
-
Repeat this process for two more conditions [#, Exit - #] and [2, Cust Service - 2]. The three new conditions are visible in the dialog.
-
Select the Terminations page.
-
Set the Number of Retries on Error option to 2.
By default, if the caller enters an invalid entry or does not respond to the request to select an option, the call is routed back to the input of the control to play the greeting again.
Use a Help Digit to implement the use of 0 (zero) as a means for a caller to transfer to the operator.
Additional PlayGreeting Controls
In the E-Z Flow example, the second PlayGreeting control plays a pre-recorded message with information about the company and its products, including a mission statement, hours of business, and new product releases.
Add the PlayGreeting control as shown in the planning flowchart and rename this control to PlayInfo1.
The third PlayGreeting control plays a pre-recorded message providing an off-hour customer support phone number, a web site address, and a bulletin-board service number.
Add the PlayGreeting control as shown in the flowchart and rename this control to PlayInfo2.
OnHook 
(Added automatically by template)
The OnHook control terminates the session by placing the phone on-hook.